A Helpful Guide to Diamond Painting: Techniques, Tips, Tools, and Framing
Posted by Lynn Hamilton on 15th Feb 2014
Here's a helpful guide that explains everything you need to know about how to do diamond painting.
Table of Contents:
What is Diamond Painting?
How To Diamond Paint
What Tools Do I Need To Buy For Diamond Painting?
What’s the difference between full and partial diamond paintings?
Diamond Painting Techniques
Diamond Painting Tips
Diamond Painting Tips and Techniques Videos
How to Frame A Diamond Painting
Conclusion
![]()
Also be sure to read to the end because we have a couple of links to some amazing diamond painting tips and techniques videos for the advanced diamond painting expert.
WHAT IS DIAMOND PAINTING
Quite simply diamond painting is a cross between paint by numbers and jigsaw puzzles.
It could just as easily be called diamond paint by numbers or painting with diamonds.
Just as paint by numbers for adults is catching on so is diamond painting.

Instead of painting the appropriate colors in corresponding spaces we place square or round diamonds in their appropriate places on the diamond painting canvas; thus paint with diamonds.

Diamond painting goes by many names and is sometimes called:
Diamond art
DIY diamond painting
5d diamond painting
5d DIY diamond painting
3d diamond painting
3d DIY diamond painting
diamond painting cross-stitch
Diamond painting embroidery
Diamond cross-stitch embroidery
Painting with diamonds
Painting by diamonds
Paint with diamonds
Paint by diamonds
Whatever it’s called it’s all the same.
HOW TO DIAMOND PAINT
Here is a step-by-step helpful guide on how to to do diamond art.
1. Buy the best diamond painting kit you can find
Get one with engaging colors or a soothing composition.
You will be investing quite some time into the project, so it’s important to make sure you look forward to completing it.
If you’re not sure what size to get, see our blog post here: “What Size Diamond Painting Should I Buy?”
Short answer: a large diamond painting is better than a smaller-sized diamond painting.
But not in all cases.
For beginners, maybe something smaller is better.
Where do you find diamond painting kits?
They're easy to find on the web. Just google diamond painting or go here:
We’re a little biased, but there are dozens diamond painting companies out there.
Look around. We stand by our products, prices and our customer service.
Ordering a diamond painting is simple.
The hardest part is next.
Waiting for your 5d diamond painting kit to arrive.
When it arrives take the following diamond painting steps.
2. Take an inventory
We can’t stress this enough.
Make sure you have all your diamond painting tools.
Double check to ensure you received the correct diamond painting canvas.
Check the canvas to ensure it is printed properly and it is the correct size.
Use your inventory sheet to take an inventory of your diamond gems.

Take a close look at your diamond drills.
They should not be clumped, they should be whole and there shouldn’t be bits and fragments mixed in with the diamond dots.
If you ever have any issues, contact your diamond painting supplier immediately and send a picture of the issue along with a polite email.
Most reputable diamond painting companies will respond within a few hours and will work to fix the issue.
This is the time to make sure everything is ok.
Some companies will not honor refunds, returns or fix problems if too much time has passed from the time you have received your diamond painting.
Do the inventory right away.
With the huge volume of diamond paintings, there are going to be issues.
At Diamondxpres we bend over backwards to fix them…..just sayin.
3. Set the diamond painting canvas.
Set your adhesive canvas down on a table, making sure the surface is wide enough.
Once spread, you will notice it is divided into small areas, each of them labeled with symbols or numbers—one for each diamond color.

To help you understand these codes, you can find a chart that will connect the code with the corresponding color.
This visual aid will be your ally and best friend through the process, so make sure to study it for a minute or two.
- Peel back a small section of the paper or plastic protective covering.
Starting from a corner is the preferred method.

- Identify the colors required for this section and carefully add a small amount of drills into the diamond painting tray.

One color at a time.
Use enough to fill at least half the tray one deep.
Gently shake from side to side to spread the diamond dots evenly and get them lined up in their groves.
- Dip the diamond painting pen tip into the wax.

You only need a small amount of wax. The tip is normally hollowed a bit so it will take the proper amount of wax.
- Place tool tip onto the top of the drill.
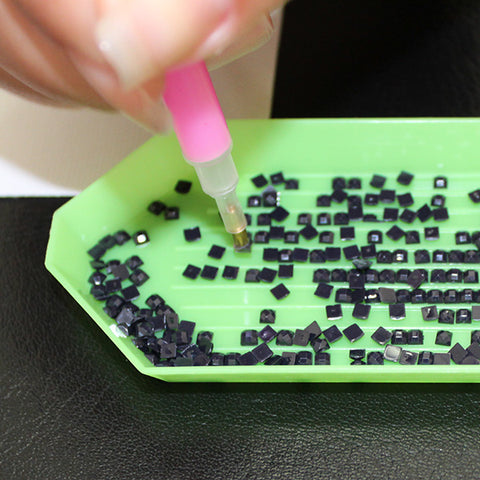
The bottom of the drill is flat so make sure that side is down.
- Place drills, flat side down, on corresponding squares or circles until the picture is complete.

You can also use tweezers to do the same thing.

Repeat as necessary until your diamond painting is complete.
- Marvel at your wonderful finished diamond art and share pictures of it with family and friends.
Keep these diamond painting instructions handy and share them with a friend or two.

WHAT TOOLS DO I NEED TO BUY FOR DIAMOND PAINTING?
None.
Each diamond painting kit comes with all the necessary 5d diamond painting tools to complete the project.
Each 5d diamond painting kit comes packaged in a padded envelope or a cardboard box.
It all depends on the size of the diamond painting.
Diamond paintings smaller than 30cm x 30cm generally come in an envelope.
Larger diamond paintings come in a box.
Single diamond paintings can be as small as 15cm x 15cm and some are as large as 100cm x 140cm
You've probably noticed by now that diamond painting canvas sizes are measured in centimeters.
Not familiar with centimeters?
That's ok. We've developed a diamond painting centimeter to inches conversion tool.

What tools come with my diamond painting?

This is a picture of everything that comes with a diamond painting. You can see that it truly does come with all the diamond painting accessories included.
In the diamond painting package you'll find:
Plastic bags filled with the diamond gems
An inventory sheet that includes 5d diamond painting instructions
A pair of tweezers.
A plastic grooved drill tray.
A drill pen.
And a piece of wax or glue as it is sometimes called.
It's important to not that frames are not included.
Diamond Painting Gems:
The small plastic or resin diamonds are also known as:
drills
diamond drills
5D diamond drills
3D diamond drills
gems
beads
diamond painting beads
rhinestones
5D rhinestones
5D diamond painting rhinestones
diamond dots
diamond dotz
diamond sparkles
gemstones
resin gemstones
tiles
diamond painting tiles
diamond embroidery beads
and as some people call them by the technical term….doohickeys.
Whatever we call the drills, they are the essential pieces that make the beautiful paintings.
They’re incredibly tiny too.
Most are only 2.5mm x 2.5mm
So 4 of them make a centimeter.

They come in 447 different colors and each color is identified in the DMC color scale used by sewing and knitting enthusiasts.

DMC stands for Dollfus-Mieg and Company which is a textile company founded in Mulhouse, France in 1746 by Jean-Henri Dollfus.
Daniel Dollfus, a nephew of Jean-Henri Dollfus, renamed the company "Dollfus-Mieg et Compagnie" in 1800, after marrying his wife Anne-Marie Mieg.
Great!
Now that we know that bit of amazing diamond painting trivia we can wow other diamond painters!
They also come in two different shapes: square and round.

What is the difference between a round drill diamond painting and a square drill diamond painting?
A square drill diamond painting will be clearer than a round drill because the diamond gems are tighter.
All round drill diamond painting kits have areas around the gem that aren’t covered by any part of the gems.
The gems are very small but it is still noticeable.
We can only tell the difference on closer inspection.
From a distance they look pretty much the same; bright, shiny, brilliant, sparkly and awesome.
On a completed diamond painting from a distance it is hard to tell a round diamond painting from a square diamond painting.
Square will normally give the diamond painting more of a sparkle and pop, but round diamonds are easier to work with.
Which one is right for you?
We took a very scientific poll on Instagram….okay so it wasn’t that scientific, but we found about 61% of respondents like square diamond paintings more.

Go figure.
Tweezers

Despite their versatility, pens are not for everyone—the constant pressure required might hurt your fingers, and could cramp your hands.
You don’t need to worry, though. We have the solution.
One of the standard 5D diamond painting tools included in all packages is a set of tweezers.
These classic tools allow you to pick a diamond by its side and set it with high precision on top of the canvas.
They are most effective when working with individual drills, but you can handle up to two drills at the same time if you are skilled at it!
You’ve seen one pair of tweezers you’ve seen them all right?
Not necessarily when it comes to diamond painting.
Some diamond painting tweezers come with angled ends and some come with straight ends.
Angled or straight ends? That is the question!
For us it doesn’t make a difference, we’re good to go with both kinds, but you never know.
Diamond Painting Drill Tray
We didn’t think a topic like this could be exciting….but….to a diamond painting enthusiast a good drill tray is essential.
Most drill trays are plastic and measure a couple inches by a couple inches and are rectangular in shape.
Each has grooved rows to hold the drills steady and in a straight line.
Pour the gems in and shake them slightly and watch them magically line up.
Check out this video....mesmerizing!
For a beginner, we’ll admit, it just doesn’t matter what type of drill tray you use.
However, as you get more experienced and your diamond painting technique improves you’ll definitely want a tray that meets your skill level.
Bigger trays for larger projects.
There are also trays designed to hold more than one color gem at a time.
Pretty cool. Right?
Diamond Painting Pens

Drill pens are pen shaped instruments that are dipped into the wax pad and then onto the drills to place them on the canvas.
Other than the canvas itself, the pens are the soul of diamond painting.
They have hollow ends that you fill with wax / glue and this allows you to pick the diamonds with little to no effort, and stick them gently in place.
Most of the pens that come with diamond painting packages feature a double end— on one tip they can pick a single drill, while on the other one they can hold multiple diamonds.
There are hundreds of different types of drill pens.
Some glow in the dark.
Some come with padded grips.
Some come with glow in the dark padded grips.
Some come with an adapter for multiple drills.
You get the point.
No pun intended.
Diamond Painting Wax
Each kit will come with sufficient wax to complete the DIY diamond painting.
Using the wax is pretty straightforward.
Just dip the end of the diamond pen into the wax and get started.

Later on we will discuss some diamond painting techniques in case you run out of diamond painting wax at the last minute.
Light Tables

Light tables don’t come with diamond art kits.
However a diamond painting LED light table is an essential tool for any serious diamond painting artist.
The light tables shine light through the back of the diamond painting canvas and make it much easier to place the diamond tiles.
This is one of the must have additional 5D diamond painting tools to have in your tool kit.
The best part is that they have plenty of uses outside of diamond painting, so it's an investment you won't regret.
Rollers

You’d be surprised, but that roller you keep in your kitchen is a highly valuable diamond painting tool.
Rollers help in the setting and pressing of your masterpiece once you are finished, making sure your diamonds stay in place.
The way to use a roller is simple—cover your canvas with a linen cloth and gently go over it up and down, to ensure every drill is equally pressed.
This procedure is just an extra measure to make sure your work remains firm and withstands the test of time.
Gem organizers

In most diamond painting kits, the drills arrive in prepackaged bags, all labeled with the code number or symbol that identifies them within the canvas.
While it’s perfectly fine to keep the diamonds stored there, odds are that you’ll run into more than one inconvenience.
After all, plastic bags are fickle and can open easy which gets messy quickly.
To avoid this, you can purchase diamond painting gem organizers—trays divided by grids featuring plastic removable boxes.
They allow you to store each diamond by color, label them, and later they can be reused for your next project!
The diamond painting inventory sheet

Ahh, the often-overlooked inventory sheet.
Each diamond painting comes with a piece of paper with instructions, a picture of the diamond painting and a drill inventory.
Here’s a key diamond painting tip: don’t discard this piece of paper until you are finished with your diamond painting.
You might need it in case you are missing drills.
Most diamond painting suppliers will ask you for a picture of this piece of paper with a circle around the missing drills.
This helps for diamond painting manufacturing quality control but also ensures the correct replacement diamond drills are sent.
WHAT’S THE DIFFERENCE BETWEEN FULL AND PARTIAL DIAMOND PAINTINGS?
A full diamond painting kit means that the entire diamond painting canvas has places for gems.
A partial diamond painting has some of the area colored in for you.
Partials are easier and faster to complete and make great kids diamond paintings.
Want to spend some quality time with some kids?
Let them work on a partial diamond painting.
DIAMOND PAINTING TECHNIQUES
We’ll readily admit diamond painting is a fairly simple craft but like any craft there are techniques which will speed and aid the process.
Work by areas
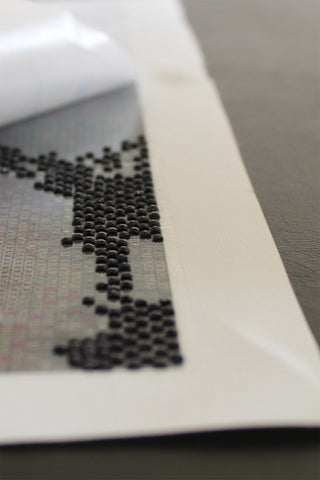
A diamond painting canvas is sticky by nature—it needs to be that way to help the drills remain in place.
An unfortunate downside is, however, that particles of dust, hair and other undesirables end up joining your beautiful canvas against your will.
To preserve your painting, we suggest you work on it by segments—keep the canvas covered by the protective layer, and reveal it little by little as you progress on the project.
Don’t be afraid to cut the protective layer as you see fit and only remove what is necessary to move ahead.
Consider carefully the type of drills you are using
It may seem irrelevant at first, but the shape of your beads plays an important role—square drills do not work the same way as round ones.
Each has its ups and downs, and you have to maneuver your techniques accordingly.
Square beads are easier to handle, as the edges make them more manageable.
Likewise, they also provide better coverage of the canvas, reducing the possibility of empty spaces between drills.
However, that is also their downside—you may not have space to place a bead between others.
Taking this into consideration, it's better if you work with square drills by area and not by color, this will reduce the possibility of reduced spaces when filling up spaces in a different shade.
Round beads, on the other hand, give you plenty of space to worth with, so running out of room is not a concern.
However, the empty areas between the drills are not good news—that sticky surface ends up exposed to the dust particles that keep floating around.
That issue has a solution—keep reading to find out!
Start from the top, aligning yourself according to your dominant hand.
If perhaps, you picked a large diamond painting canvas, you may be hesitating—what is the best starting point for your DIY diamond painting?
It’s simple—start from the top and align yourself to the corner that matches your dominant hand.
If you are right-handed, it's best if you start at the top right corner, while left-handed folks should go for the top left one.
Starting at the bottom means that, as you progress, you may slide your canvas down, risking it will fold or lack the support of your table.
Working your way down, instead of up, reduces the risk of damaging your painting.
Likewise, working according to your dominant hand ensures that you will not rest your hand on top of the sticky surface as you work on your diamonds, protecting it from any dust particle or residue that may be on your skin.
It also very annoying when your hand sticks to the diamond painting.
Apply over three diamonds at the same time
Some of the pens available for diamond paintings are double-ended—the extreme opposite to the tip opens wide, turning it into the perfect size for picking more than one drill at the same time.
The most common type allows for three beads at the same time, but some special pens can pick even more.
Using the multi-diamond pen helps you complete large areas of the same color in record time, all while keeping your diamonds in a straight line.
Use a checkered pattern
Of course, not everyone enjoys the multi-diamond tool—and for those folks, we have an alternative to fill large areas of the same diamond color: use a checkered pattern.
It's simple enough.
Create a frame by filling beads in the shape of a rectangle or square within the large area.
After that, you can start working on your checkered board following multiple strategies—place the beads alternating a space between them, insert them diagonally, and so on.
After finishing your checkerboard, filling the spaced between should be easy.
This technique makes completing large areas fun, it helps beads look more organized and aligned and it’s faster.
Trust us, you’ll see.
Realign misplaced drills with tweezers or toothpicks
It happens—sometimes you make a mistake while placing the gem, or after finishing your piece you realize that some drills are not as aligned as you like them.
For these last-minute corrections, tweezers and toothpicks might be your best allies.
If your bead falls onto the canvas, or you’ve misplaced it and would like to relocate it, odds are tweezers will get the job done—hold the drill gently and lift it upwards before removing it.
If instead of lifting it you’d simply prefer to realign your bead, a toothpick might be the right pick.
Gently push the drill with the tip of the toothpick. It’s amazing how well this works!
Set your diamond painting with a roller
After finishing your diamond painting there’s more work to be done.
For starters, you can set the beads of your masterpiece in place with a roller.
Any regular kitchen roller will do, but you can also use a bottle.
Roll it up and down on top of the canvas, making sure to press down gently.
While some people suggest you use the roller after finishing each segment of your painting, we don’t recommend it.
Misplaced drills sometimes are more noticeable at the end, so it's better to set the diamond painting once you're sure each bead is in its right position.
Seal your diamond painting
Setting a diamond painting is essential, but it will not make your masterpiece last forever—the drills could potentially detach as the glue weakens.
You can seal your diamond painting with the help of a high-quality sealant.
It will protect it from time, dust, and will make it resilient enough to be with you for a long time.
It’s important to examine the chosen sealant thoroughly, and make sure it won’t affect the shine of the beads.
Some sealants, if applied excessively, will make the painting dull.
If you are using a paste, use paintbrushes, while sprays might need more than two applications.
Important note: be sure your diamond painting is perfect before applying the sealant—once you do, there is no going back.
DIAMOND PAINTING TIPS
Now that you know some of the basic techniques to create the best diamond paintings, it is time to introduce you to the tips.
These are the little tricks that will add to your overall diamond painting experience.
Uncurl and flatten your canvas by using the protective adhesive layer
Most diamond panting kits arrive with the canvas rolled up.
While this makes transportation easy and prevents damage to the surface, it creates a secondary problem.
The canvas tends to remain rolled.
You can try putting books on top of your canvas or sticking it to the table with tape, but we have a faster and easier method.
Lift the adhesive layer on one of the corners, then immediately reseal it while the canvas is flat against the surface.
Repeat this action on all four corners.
It only takes a couple of seconds, and you’ll see the results immediately.
Diamond painting with multiple colors at a time
On most projects you’ll eventually want to have 2-3 colors handy at any one time so you might have multiple trays going at once.
Since each diamond painting comes with its own tray you’ll eventually have a fleet of them.
Place a small post it note on each one with the color code and you are set for fast and easy multiple color at a time diamond painting.
You can also use egg cartons, plastic Baggies with labels, small plastic condiment holders, or old pill bottle caps.
Never throw unused diamond drills away
They are like gold.
Save them.
Put them in a baggie and label their DMC code.
You might need them later.
A friend might need them later.
You might want to use them on a blank canvas diamond painting.
We use labeled Baggies stored in shoe boxes.
Boxes are label according to the range of colors inside (ie 300-700) for easy retrieval.
Tape a drill next to its symbol on the chart for easy reference
Try sticking a diamond right next to its code in the chart.
You will always have a visual reminder of the right bead to pick.
Carefully slice through air pockets.
Sometimes, your canvas arrives with air bubbles.
This shouldn’t happen and is not normal.
Most reputable companies will work with you for a replacement.
However, many of the air pockets lie relatively close to the surface, so there is a solution.
Using a sharp blade, slice the air pockets in a very gently and avoid damaging the actual canvas.
Tape the sticky edges of your canvas
Some suppliers will send diamond painting canvases where the edges are also covered by the sticky surface.
We don’t.
Continue exposure of these borders to the air and dust particles floating around means that, if left uncovered, they could turn into a fuzzy mess of dirt, effectively ruining the beauty of your work.
That’s bad.
The most effective method to prevent dirty edges consists in covering them up.
To achieve the best outcome, it's better if you use masking tape.
Lift the protective layer and gently cover the edges of your canvas, then set it down again.
Separate clinging drills with dryer sheets or an extra tray
Perhaps as a consequence of ongoing static, some beads end up clinging to one another.
This is an annoyance that makes it almost impossible to pick them up in the right position.
One of the preferred methods to fix cluttered drills requires dryer sheets.
Rubbing the affected diamonds on top of one of these will instantly get rid of any cluster, and some even suggest adding them to the storage process.
However, there is a far easier method—place the cluttered diamonds on a tray and, if you happen to have an extra one, press it on top.
DIAMOND PAINTING TIPS AND TECHNIQUES VIDEOS
Here's another video that has some advanced techniques that could save you money some day. Additionally this diamond painting video tackles some of the more difficult diamond painting problems you might encounter.
You can order a blank diamond painting canvas
Not many people know this.
Got a little artist in you?
Are you ready for a challenge?
Want an awesome use for all the extra diamond drills you have lying around?
Get a 5d blank diamond painting canvas and show everyone your artistic skills.
You can order them like any other diamond painting.
Most stores carry them.
Just search for “blank” and you should find them.
HOW TO FRAME A DIAMOND PAINTING
Now, the big question.
What to do with a finished diamond painting.
It’s a perfect display of your talents, abilities, and hard work, so it deserves to be shown in its glory, for the world to see the beauty of your labor.
But how do I frame a diamond painting?
The options are endless—you can sew your canvas onto another object, or maybe stick it as a decoration.
However, the most popular one is framing, displaying it as if it were a regular painting.
You can get a good frame for your diamond painting at Michaels or any other craft shop.
Diamond painting frames are not special frames.
Framing your diamond painting does not follow a single, universal step-by-step guide.
Regardless, there are some tips you can follow to achieve the perfect finish for your displayed masterpiece.
First of all, keep in mind that you must measure everything, as finding the right fit requires precision.
Make sure to exclude the white borders, and order a frame that is slightly smaller—this will ensure that only the diamonds will be on display.
Next, consider whether or not you'd like a glass frame.
As mentioned before, canvases can gather some dust and dirt with time, so the extra protection provided by the glass would be a great asset beyond your sealing.
However, a glass frame would diminish the shine and glitter of your diamonds, dulling its display.
If you decide to ditch glass altogether, you can keep your diamond painting clean by frequently wiping it in a gentle manner.
Don’t worry about dust sticking to the canvas if you properly sealed your artwork, it should remain beautiful for years.
Got some other tips for how to frame diamond art? Share them with us in the comment section.
CONCLUSION
Diamond painting is more than a hobby—is a craft that allows you to create something marvelous from scratch.
Relaxing and engaging, this activity is virtually effortless yet requires steadiness and dedication.
If your fingers are itching at the chance of bringing a glittery masterpiece to life, take a chance and buy a kit.
Odds are you won't want to stop.
Do you have more diamond painting techniques and tips to share?
We'd love hear about them here.
Next time you get asked how do you do a diamond painting you can send this diamond painting blog post.
Feel free to share this diamond painting blog post with your friends, clubs and family members.
For sticking with us, use TIPS30 for 30% off your next diamond painting at Diamondxpres.
Thank you.